How to Install ArchLinux on a Virtual Machine
Preface
Many people mention that their first reaction to ArchLinux is the difficulty of installation. There are several reasons for this difficulty, which we will address next.
- No graphic user interface:
ArchLinuxonly provides a minimal environment. All of the install operations should be completed in the command line. This is the most difficult to overcome for many people who do not have experience in command line operations. Many Linux distributions can be popular because they provide user-friendly and streamlined installation processes. This has helped many people solve the first step in learningLinux: Installing aLinux. - Insufficient prior knowledge and lack the ability to find and solve problems: No exposure to knowledge that is important to installing operating systems, such as system booting, configuration file editing, and command-line operations. Once the results of their operation do not match the tutorial, they do not know how to solve the problem.
- Lack of proper tutorials: The best and most complete tutorial for installing
ArchLinuxis the official Installation guide and Wiki. Since the official Wiki is written in a way similar to the documentation, there is no chronological step-by-step installation process that we are used to, causing difficulties for people who are unfamiliar with this type of writing in reading and using. Other tutorials are often outdated or do not take into account the reader’s understanding ofLinux, ignoring some of the newcomers who are prone to making mistakes.
This tutorial is designed to be consistent with the existing official Wiki and includes links that are suitable for beginners to learn. I hope that anyone who has read this tutorial will be able to improve their ability to learn existing and future new official Wiki content.
The advantages of ArchLinux or Linux are not mentioned here. I betlieve that people who will review this tutorial must have already understood it. And you can get a lot from this process.
Precautions
Be sure to read each instruction in the tutorial carefully. Most of the installation failures were caused by not reading the tutorial carefully, missing or misdirecting instructions. Be sure to understand the contents of the tutorial, not just enter the command without understanding the description.
Installation Tutorial
Pre-installation
The installation media and their GnuPG signatures can be acquired from the Download page.
Choose a mirror site locates in your region, then download the iso image file looks like archlinux-**-x86_64.iso.
Verify Signature
It is recommended to verify the image signature before use, especially when downloading from an HTTP mirror, where downloads are generally prone to be intercepted to serve malicious images.
If you are using a windows operating system with 7-zip installed, right-click on the downloaded iso image file. Choose CRC SHA>SHA1, then you can see the signature of the image. If the signature does not match what is displayed on the Download page, please re-download the image file from the correct URL.
Create a Virtual Machine
Before creating the virtual machine, enter the BIOS. If the CPU of your physical machine is a Intel CPU, enable Intel VT. Or the CPU is an AMD CPU, enable AMD-V.
Reboot the system and open VMware Workstation. Click on Create a New Virtual Machine.
- Select
I will install the operating system later. - In the
Guest operating systemoption, chooseLinux. Select the versionOther Linux 5.x or later kernel 64-bit - Resize the
Maximum disk sizeand chooseStore virtual disk as a single file. - Click on
Customize Hardware.... Enter the appropriate value of memory and processors for this virtual machine. - Change the
New CD/DVD (IDE)connection. ChooseUse ISO image file:. Click onBrowse...to open the path of the image file and select it. - In
Virtualization engine, check the three boxesVirtualize Intel VT-x/EPT or AMD-V/RVI,Virtualize CPU performance countersandVirtualize IOMMU (IO memory management unit). - If you want to install a user graphic interface after installing
ArchLinux, it is recommended to check the boxAccelerate 3D graphicsinDisplay-3D graphics.
Boot the Live Environment
- Click on
Power on this virtual machine. After startup, you will see the following interface.
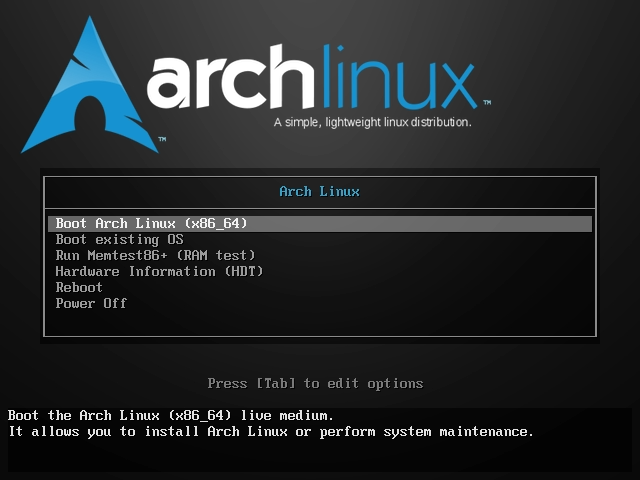
If you do not see this interface, please check the integrity of the iso image file.
Select the first option Boot Arch Linux (x86_64) and press Enter to enter the installation environment.
- At this point, ArchLinux starts loading and you will see the screen showing the following.
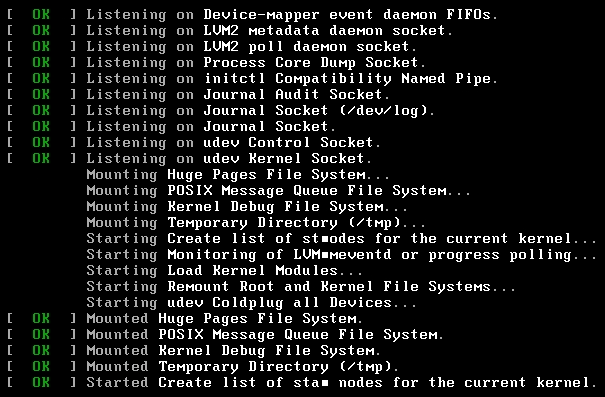
After the loading is complete, you will enter an interface with a command line.

If FAIL or other error message appears and it cannot be started, please search for the error message to get the solution.
If you are unfamiliar with the common operations of the Linux command line, please learn some of the common shortcuts or commands below.
Tab: Command-line auto-completion. Type the first few characters of the command or file name and pressTab, it will automatically complete the command or display all commands that match the characters you type.
↑orCtrl+p: Display the previous command.
↓orCtrl+n: Display the next command.
Ctrl+c: Terminate the currently executing command.
For other commonly used shortcuts, you can view 10 Linux Shortcuts You Can’t Live Without.
Set the Keyboard Layout (Optional)
If your current keyboard layout is US, you can skip this step.
The default console keymap of ArchLinux is US. Available layouts can be listed with:
ls /usr/share/kbd/keymaps/**/*.map.gz
To modify the layout, append a corresponding file name to loadkeys, omitting path and file extension. For example, to set a German keyboard layout:
loadkeys de-latin1
Console fonts are located in /usr/share/kbd/consolefonts/ and can likewise be set with setfont.
Verify the Boot Mode
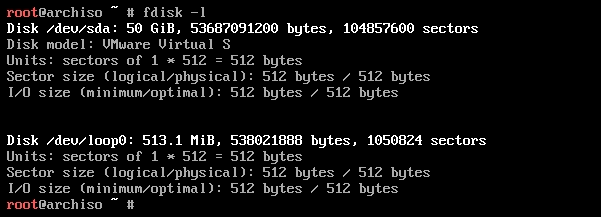
In fact, the default boot mode provided by VMware Workstation is BIOS+MBR.
Enter the following command, you can see that there is no partition whose Type is EFI System.
fdisk -l
Connect to the Internet
Archlinux cannot be installed offline. We need to download the required components online. Therefore, next we have to connect to the Internet.
Make sure your physical machine is connected to the Internet.
Enter and execute the following command to obtain the IP address.
dhcpcd
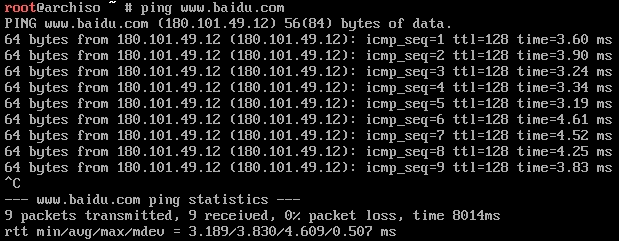
Then enter and execute the following command to determine if the network connection is working.
ping www.baidu.com
If you can see something like the following, it means that ArchLinux is connected to the Internet.
Tip: Use the shortcut
Ctrl+cto terminate the currently executing command.
Update the System Clock
Use timedatectl to ensure the system clock is accurate:
timedatectl set-ntp true
Under normal circumstances, this command does not output anything.
Part the Disks
When recognized by the live system, the virtual disk is assigned to a block device /dev/sda. Enter and execute the following command to view current partition status.
fdisk -l
The partition status has been shown previously.
Enter and execute the following command to create a root partition.
fdisk /dev/sda
- Enter
oto create a newMBRpartition table. - Enter
nto create a new partition.- First select the partition type, press
Enterto select the default optionprimary. - Then you need to assign a partition number to the new partition. Press
Enterto use the default partition number1. - Select the first sector. Under normal circumstances, you can press
Enterdirectly to use the default value. - Select the last sector. Enter the value of the last sector and press
Enter. If you want to make the newly created partition completely occupy the free disk space, you can directly pressEnterto use the default value of the last sector.
- First select the partition type, press
- Enter
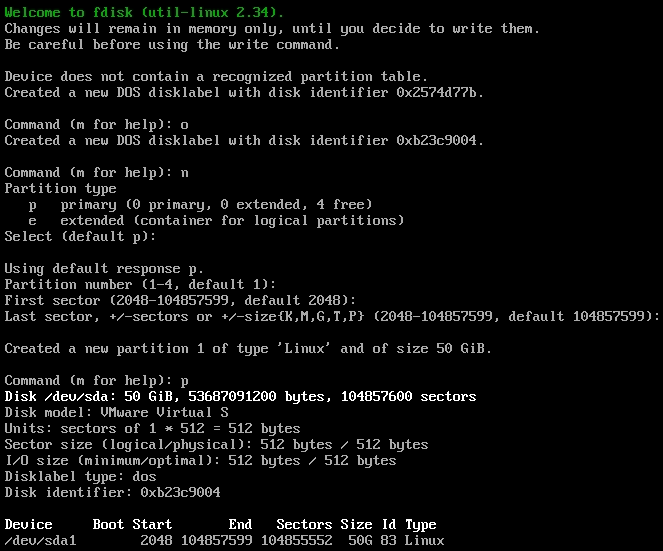
pto view the newly created partition. You can see something like the following.
- Enter
wto write all previous operations to the disk.

- Once the partitions have been created, each must be formatted with an appropriate file system. Enter and execute the following command to format the root partition you just created.
mkfs.ext4 /dev/sda1

Mount the File Systems
Enter and execute the following command to mount the file system on the root partition to /mnt.
mount /dev/sda1 /mnt
Installation
From this step, we need to do some file editing operations. So you need to master the basic operations of a well-known command-line editor Vim. It is recommended to learn from Interactive Vim Tutorial. You just need to know how to edit, copy, paste and save a file with Vim.
Select the Mirrors
The mirrors are the sources of the package we downloaded. We need to select different mirrors according to our region to speed up the download.
Enter and execute the following command to use vim to edit the file /etc/pacman.d/mirrorlist.
vim /etc/pacman.d/mirrorlist
Tip: When entering the path, you can use
Tabto auto-complete it.
The higher a mirror is placed in the list, the more priority it is given when downloading a package. You need to move the geographically closest mirrors to the top of the list.
For example, use :/China to find the mirrors under the string China. Press dd in NORMAL mode to cut the line under the cursor. Press gg to return to the beginning of the file. Press P (uppercase) to paste the line to the front of the file.
Manually input Zhengjiang University Mirror after Tsinghua University Mirror pasted before.
## China
Server = http://mirrors.tuna.tsinghua.edu.cn/archlinux/$repo/os/$arch
Server = http://mirrors.zju.edu.cn/archlinux/$repo/os/$arch
Input :wq to save and quit the file.
Install Essential Packages
The next step is to install the base ArchLinux package to the disk. This is an online download and installation process. Use the pacstrap script to install the base package, Linux kernel and firmware for common hardware.
pacstrap /mnt base base-devel linux dhcpcd
Depending on the download speed, you need to wait for a while here. When the command prompt reappears, you can proceed to the next step.
Configure the System
After installing the base package of ArchLinux, we need to configure the system.
Fstab
Enter and execute the following command to generate an fstab file which is used to mount partitions automatically.
genfstab -L /mnt >> /mnt/etc/fstab
Since this step is important, we need to output the generated file to check if it is correct. Enter and execute the following command.
cat /mnt/etc/fstab
We can see that /dev/sda1 is mounted to the root partition.

Chroot
Change root into the new system. chroot means change root, which is equivalent to handing over the control to the newly installed ArchLinux system. After performing this step, our operations are performed on the newly installed system on the disk.
Enter and execute the following command.
arch-chroot /mnt
Time Zone
Enter and execute the following command to set the time zone to your region.
ln -sf /usr/share/zoneinfo/Region/City /etc/localtime
For example, we can set the time zone to Shanghai.
ln -sf /usr/share/zoneinfo/Asia/Shanghai /etc/localtime
Run hwclock to generate /etc/adjtime:
hwclock --systohc
Install Required Package
Because we have chroot to the new system, there are only some of the most basic packages. At this time, we need to install some required packages ourselves. Then this tutorial will introduce ArchLinux’s package management tool pacman. In most cases, a single line of commands can solve the problem of packages and their dependencies.
The command format of installing new packages is pacman -S packagename. Pacman will automatically check the other packages (dependencies) needed for this package and install them together. Below we will install some packages through pacman. These packages will be used later.
Enter and execute the following command.
pacman -S vim dialog wpa_supplicant networkmanager
Localization
Set the languages we use. Use Vim to edit /etc/locale.gen.
vim /etc/locale.gen
Uncomment en_US.UTF-8 UTF-8 and other needed locales in /etc/locale.gen, and generate them with:
locale-gen
For example, we can use :/ to find zh_CN.UTF-8 UTF-8, zh_HK.UTF-8 UTF-8, zh_TW.UTF-8 UTF-8 and en_US.UTF-8 UTF-8 then delete the # before them.
Create (when the file does not exist, Vim will create a file with the same name) the locale.conf file.
vim /etc/locale.conf
Add the following to the first line of the file.
LANG=en_US.UTF-8
Input :wq to save and quit the file.
Network Configuration
Create the hostname file.
vim /etc/hostname
Enter your own myhostname in the first line of the file.
Input :wq to save and quit the file.
Edit the /etc/hosts file.
vim /etc/hosts
Add the following at the end of the file (replace myhostname with your own hostname).
127.0.0.1 localhost ::1 localhost 127.0.1.1 myhostname.localdomain myhostname
Input :wq to save and quit the file.
Root Password
Set the root password.
passwd
Type and retype your root password.
BootLoader
Choose and install a Linux-capable boot loader. Here we install the most popular boot loader Grub2.
-
First install
os-proberandntfs-3g, which can be used withGrubto detect existing systems and automatically set startup options.pacman -S os-prober ntfs-3g -
Install
grub.pacman -S grub -
Deploy
grub.grub-install --target=i386-pc /dev/sda -
Generate the configuration file.
grub-mkconfig -o /boot/grub/grub.cfg

If you do not see the message as shown, please double-check that the above process is completed correctly.
BootLoader Check
Use the following command to check whether the entry of the system is successfully generated. If it is not generated normally, there will be no system entry when booting.
vim /boot/grub/grub.cfg
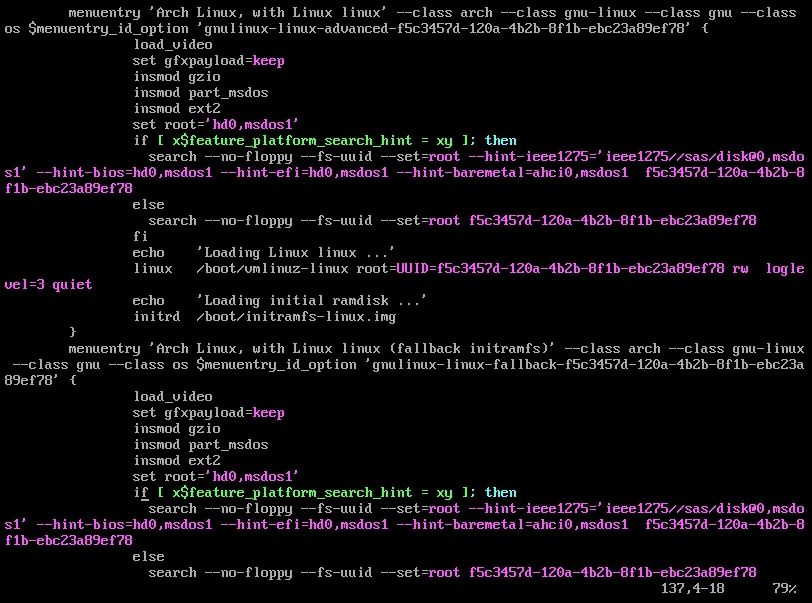
Check if there is an ArchLinux entry near the end of the menuentry section. The following figure shows the detected ArchLinux entry.
If you do not see ArchLinux entry or the file grub.cfg does not exist, please check the directory /boot first.
See if there are files initramfs-linux-fallback.img initramfs-linux.img intel-ucode.img and vmlinuz-linux. If not, the Linux kernel is not deployed properly. This is most likely caused by the /boot directory not being properly mounted. After confirming that the /boot directory is correct, you can redeploy the Linux kernel.
Pacman -S linux
Then regenerate the configuration file grub.cfg and try to find the system entry.
Reboot
Exit the chroot environment by typing exit or pressing Ctrl+d.
Finally, restart the machine by typing reboot.
Click on Edit virtual machine settings. Change the CD/DVD (IDE) connection. Choose Use physical drive: Auto detect. Now you have removed the installation media and then you can login into the new system with the root account.
Post-installation
See General recommendations for system management directions and post-installation tutorials (like setting up a graphical user interface, sound or a touchpad).
For a list of applications that may be of interest, see List of applications.